
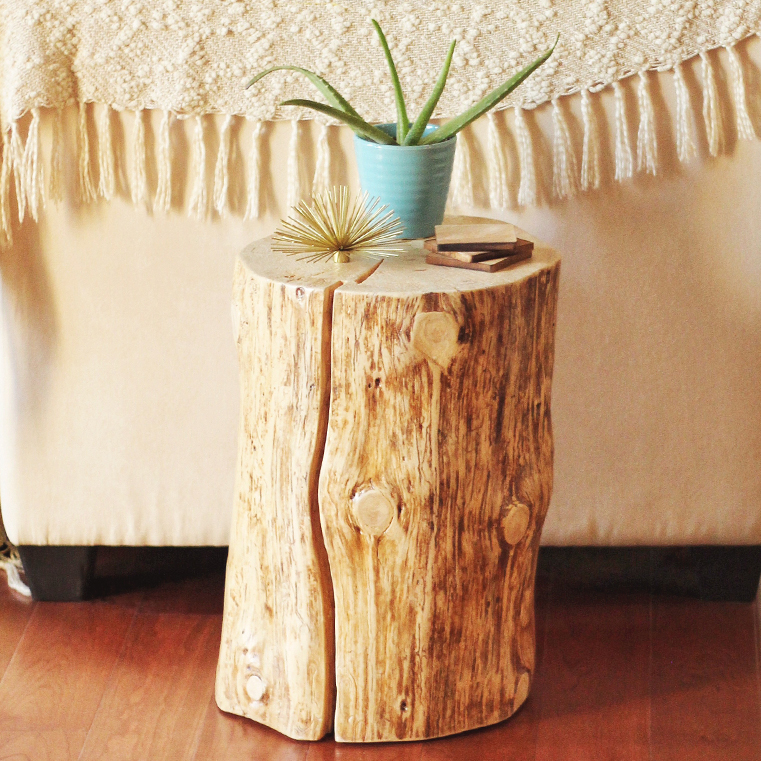
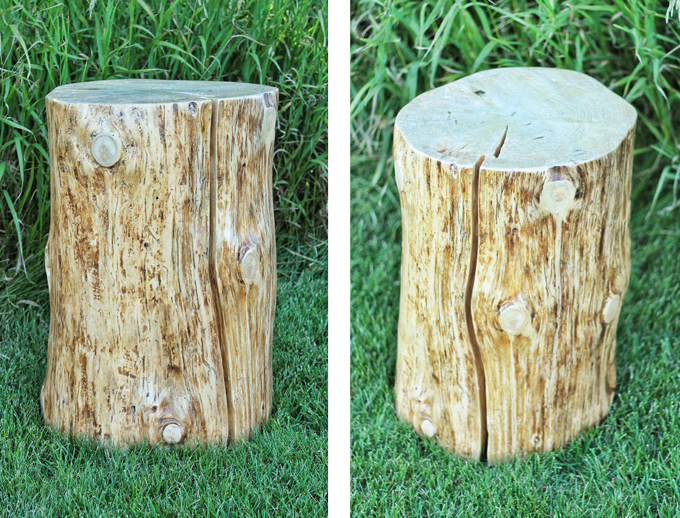
Have you ever seen natural tree stump side tables in your favourite home decor stores and thought “Hey, I bet I could make that!”? Me too — so I did! Today I’m showing you how we made our very own Natural Tree Stump Side Table! I mentioned earlier this summer that I’ve been obsessed with natural wood textures and was lusting after a side table very similar to this one (which retails at $249 at West Elm). I always prefer to make things myself rather buying them, because you’re able to create exactly the look you like at a fraction of the cost. I promise it’s simple to do, and you can make it in a weekend (seriously!).
This idea for this project started a couple of years ago when these tree stump side tables started popping up everywhere. I always knew that I wanted to make my own, because I just couldn’t justify the price tag. This summer, I spotted a nice piece of wood out at my Mom’s acreage — they’re always chopping down damaged or unwanted trees out there for firewood — and I thought it would make a perfect side table! The most important and difficult part of this project is sourcing your tree stump. The type of wood doesn’t necessarily matter, but make sure you like the general shape and ‘bones’ of the stump.
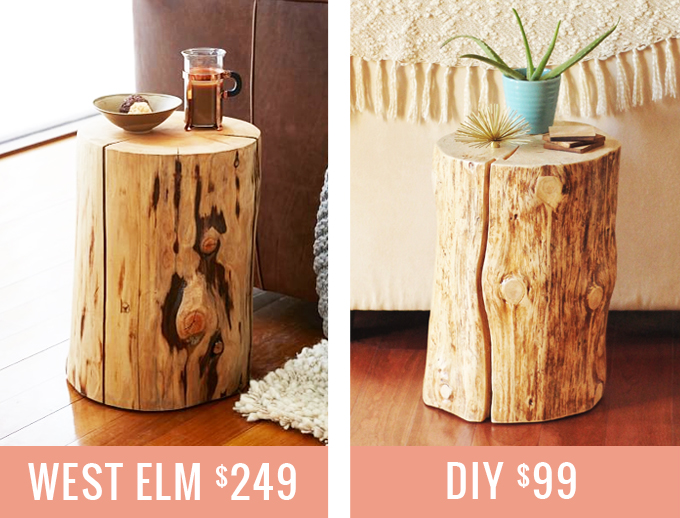
All the materials I needed to purchase for the project came in at a grand total of $99.10. Compared to $249 price tag of a similar table from West Elm, that’s a $149.90 savings! And, if you already have some of these materials, it would cost even less to make.
Be warned, when you see the tree stump in its original form, it’s hard to imagine how it comes together to be a finished piece of furniture! It is a laborious process, but it’s not difficult.
Note: I originally referenced this blog post for a general idea of the materials I’d need and what would be involved, but I ended up taking different steps and using different materials to achieve the look I wanted.
What You’ll Need
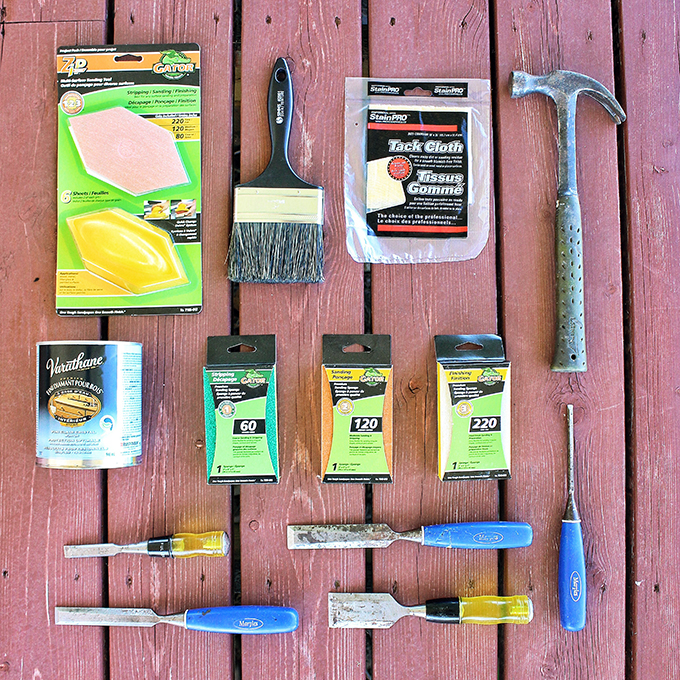
• Tree stump
• Chisels in various widths
• Hammer
• Sanding sponges in 60, 80, 120 and 220 grit
• Large, medium and small stain brushes
• Tack cloth
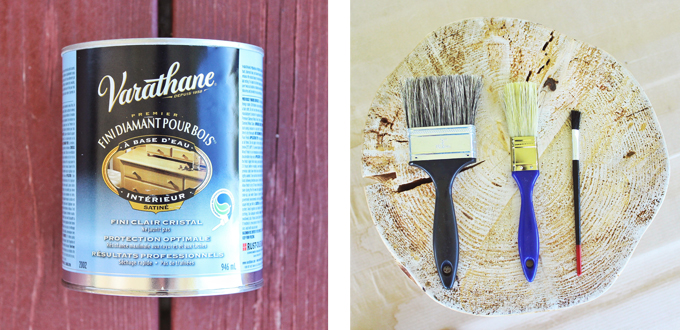
• 1 can of Varathane (I used a satin finish)
• Face mask
• Big piece of cardboard, or something to catch the wood debris
• Handsaw, or Sawzall (depending on your stump, you may not need this)
DIY NATURAL TREE TRUNK SIDE TABLE
Before You Begin
The stump needs time to dry out. Ours had about 6 months to dry out fully, but a minimum of 1 month of drying time in an indoor environment is recommended. This will ensure the bark is easy to remove and make the process easier. While it’s drying out, the stump may split — that’s okay! I love the split in our stump, it adds character and a unique touch.
Also, work on this project outside if you can. As you’ll see, it makes a pretty big mess and generates a lot of dust — you may want to wear a face mask.
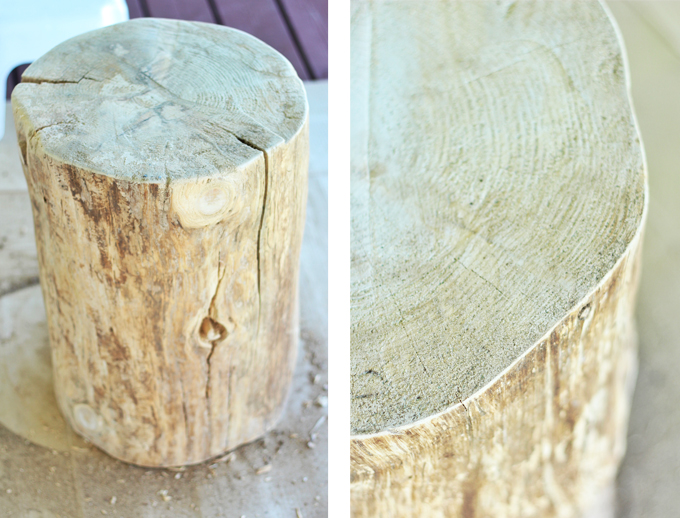
Bark Removal
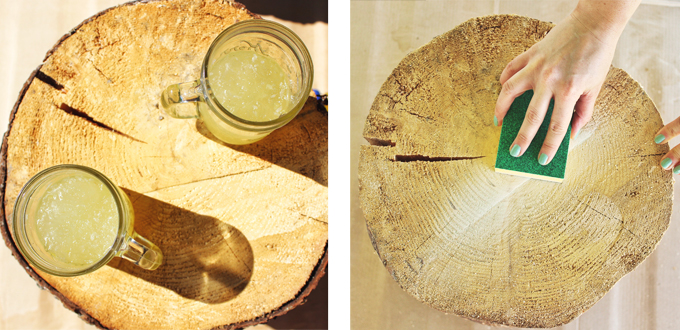
1. I highly suggest having a few drinks while you’re working, especially if you’re working outside on a nice day! We drank my White Citrus Sangria frozen and it made a delicious sangria slush! Don’t worry, I’m still doing Sober September, we made this table back in August. 😉
2. Put down a big piece of cardboard, or something similar to catch the debris before you start. Even if you’re working outside, this makes cleanup so much easier.
3. First, you’ll need to level any uneven surfaces on the top of the trunk either with a 60 grit sanding sponge or a saw (depending on how uneven the top is). If you’re happy with how the top looks, cool.
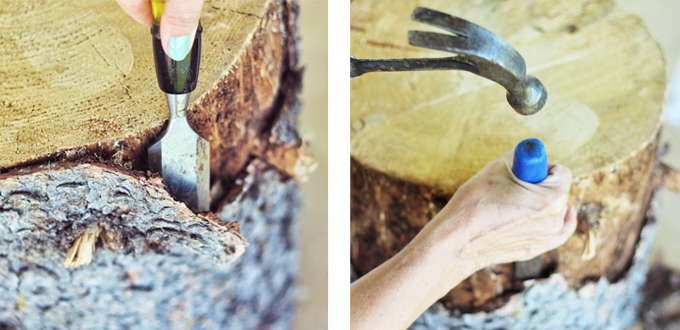
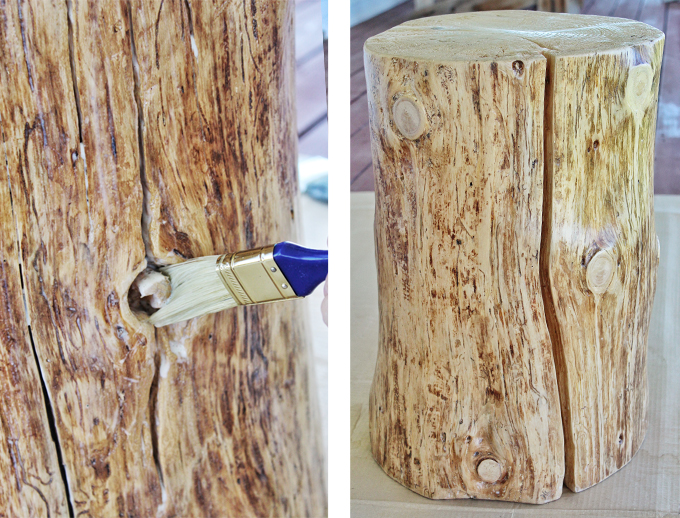
4. Then, you need to remove the bark — this is necessary. If you don’t, the stump won’t seal properly and the bark will eventually fall off anyway. We used a few different chisels, and found that it came off quite easily.
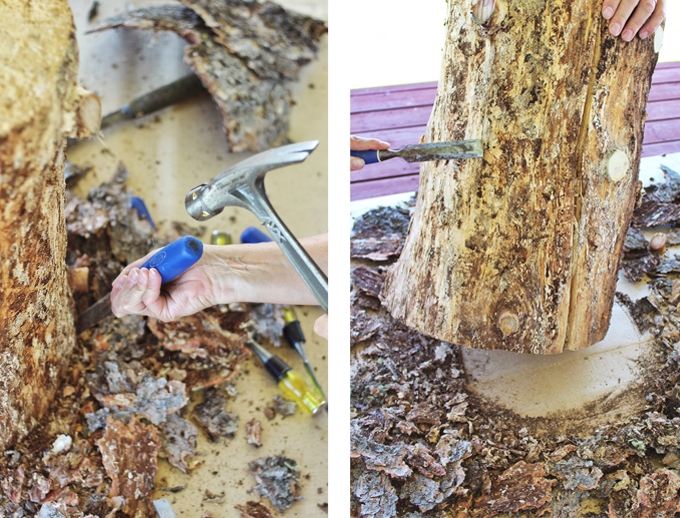
5. One side of the stump had a lot of extra sap and bark remnants on it, so we carefully removed as much of that as we could with a chisel (and a hammer in stubborn spots), working with the grain in downward motions. This stump looks like a mess at this point — don’t worry, it will all come together!
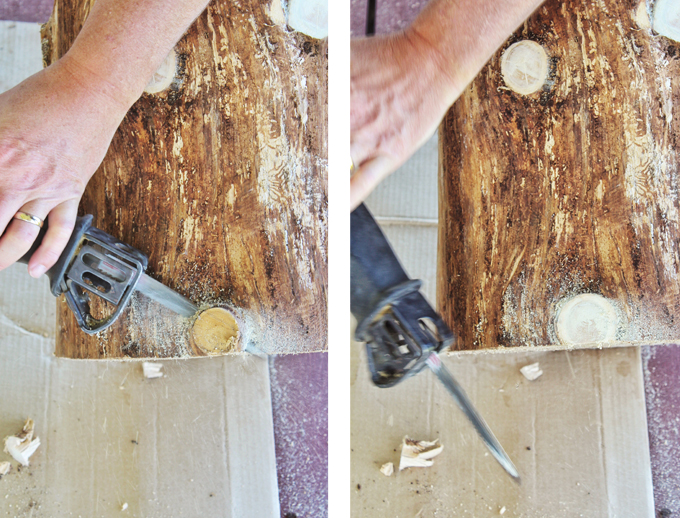
6. Once the bark and sap remnants are removed, if your stump had branches, you’ll need to saw any branch remnants down be flush with the rest of the stump. We used a Sawzall for this.
7. Clean up your work area — dump all the wood, bark and dust off the cardboard, and into the trash. Give the cardboard a good shake.
Stripping & Sanding

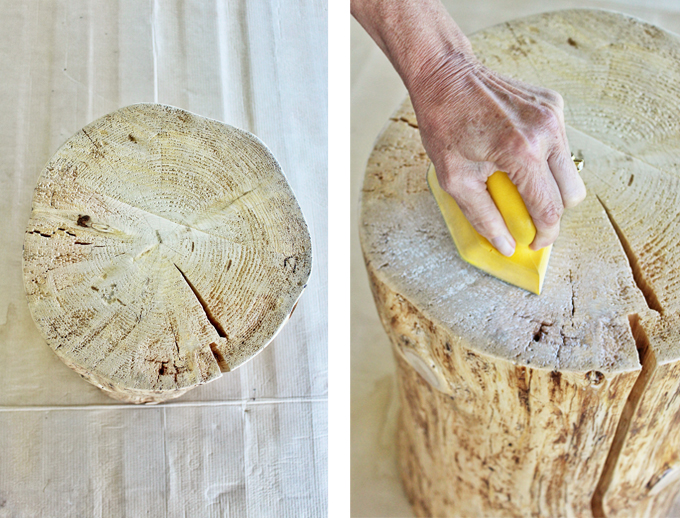
8. Start by using a 60 grit sanding sponge to strip any major bark remnants and clean the stump up.
9. Then, we used an 80 grit sanding sponge to remove the sharp edges on the top and bottom of the stump and bevel them. We also ran the 80 grit over the sides to further smooth them — making sure to get into the split and knots in the stump and bevel all the edges there as well. The goal here is to have an entirely smooth surface when you run your hands over it.
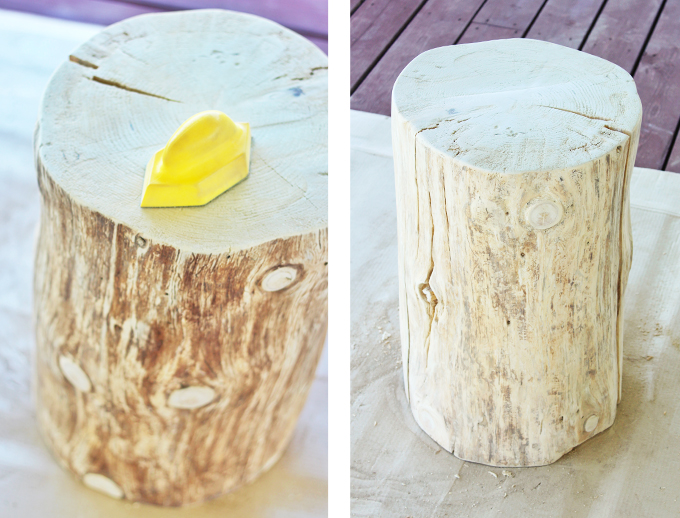
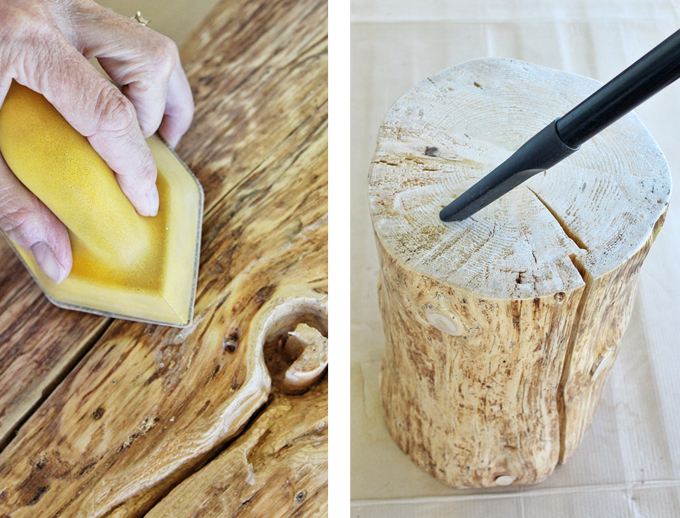
10. The stump was looking pretty good at this point, so we moved on the 120 grit to really refine the wood, and 220 grit to finish it off and make it ultra smooth. You’ll notice a lot of dust with this step, and the stump will start to look very light in colour.
11. Then, vacuum the stump and all crevasses to remove all the extra dust (we used a shop vac for this that stays in the garage permanently). I also shook all of the dust off the cardboard and vacuumed it, too. It’s important that you remove all the dust from your work area at this point — flip the cardboard over if you need to, or just remove it until you start the sealing phase.

12. Now, run a tack cloth over all surfaces to remove any remaining dust. Keep rotating the cloth so you’re using up all the available tack to get the dust off of the stump. See how the colour starts to come back as the dust is removed?
Sealing
Note: I didn’t want to stain the stump, because I love the natural textures and colors of the wood. If you want to stain your stump, now’s the time to do it. Follow the directions on the can, and when you’re happy with it, move on the to the sealing phase.
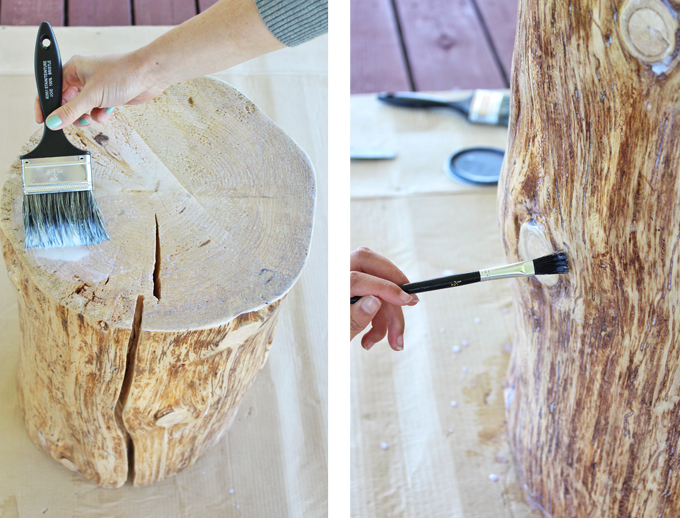
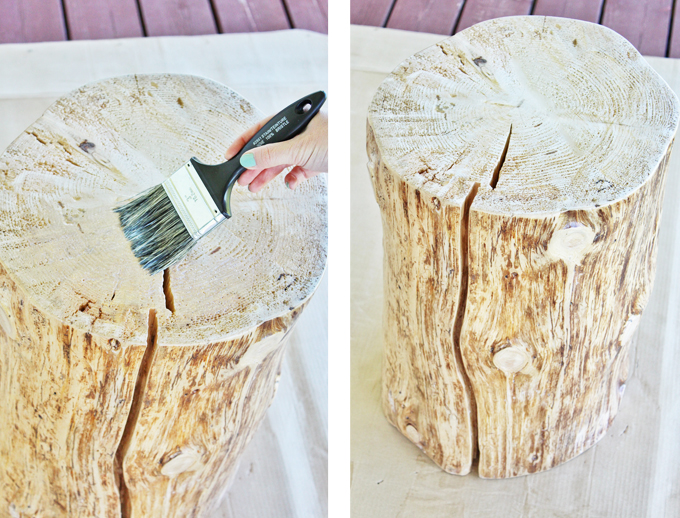
13. Make sure you follow the directions on the can of varathane you’re working with. If you’re using a satin sealant, it will look cloudy until it dries clear. Start with the first coat on the top, then the sides. Go in with a large brush first to get everything coated, and then follow up with a small brush for the details. Then, use the small brush to remove excess sealant from the any nooks and crannies where it may have pooled and dripped.
14. Allow the sealant to dry completely between coats, following the instructions on the can. I let mine dry about 2 hours between coats. Apply 2 more coats to the top and sides.
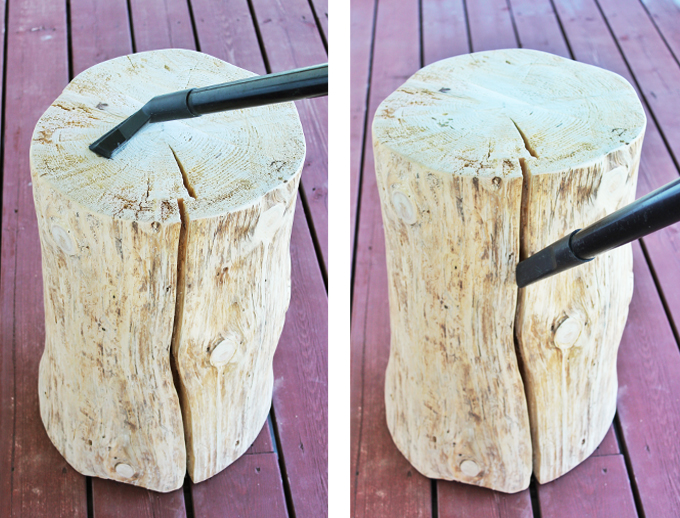
15. Once the 3 coats have dried, you’ll probably notice that the top of the stump feels rough — this is because the sealant soaks into the natural texture of the wood and emphasizes it. We sanded the top down again with 120 grit sanding sponge, followed by 220 grit to ensure it was really smooth to the touch.
16. Check out the sides of the stump. The sealant may have dripped and pooled on the sides or at the bottom, so lightly sand that away with 220 grit sanding sponge.
17. Vacuum up the dust, then remove any excess dust with the tack cloth, like you did in steps 9 and 10.
18. Apply the 4th coat of sealant to the top and sides.
19. Then, apply 1 more coat on just the top.
20. Once the last coat is fully dry, you’re done! Make sure you follow the complete drying directions on your can. I let the stump dry for a week indoors before use.

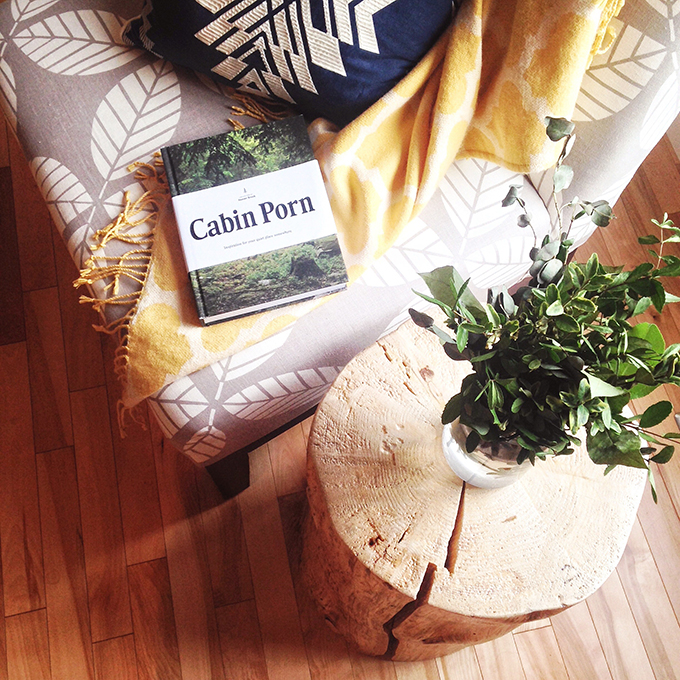
I gave this Natural Tree Stump Side Table to my friends Kelsey and Frank for their wedding gift! It was difficult to part with it (my family helped me make it, and my Mom affectionately named it Stumpie!), but at least I can still visit at Kelsey and Frank’s place. It’s okay though, I have plans for a big natural wood coffee table (see the raw wood in this post, under #6). Once I’m finished making that one, I’ll definitely post about it here, too!

But before I gave it to them I played around with using it for a recipe shoot. It makes a great prop! Here’s the link to my Peppered Pear Elixir.
Here it is in Kelsey and Frank’s place! Kelsey loves natural, cabin-y things, and is using the table in her reading nook. Check her out on Instagram!
Are you guys planning to make a Natural Tree Stump Side Table? If you do, let me know how it goes! I’d love it if you could tag me on social media or leave a comment for me below. I hope this post is helpful, and if you have any questions for me, please leave them in the comments below. I’ll do my best to help you out!
Disclaimer: This post is not sponsored, and contains my genuine thoughts, ideas and recommendations.

55 Comments
[…] I made one — head over here to check it […]
I just wanted to say that I am getting ready to start my project of previously cut down Locust Tree. I am going to make a round end Table with Three leg’s for between two New Recliners. I would love to have a ceder neutral tone stain maybe a top shelf Epoxy for abundance of shine on round table top, cause cold drinks and want easy wipe top. Epoxy Brandi with ultra clear look,what do you suggest for brand of epoxy to use.
Hi Scott! Unfortunately I don’t have experience with Epoxy as I used a satin finish Varathane for this project, as noted in the post. That said, I wish you a successful project!
[…] – I used the Tree Stump Side Table I made for Kelsey as a prop in this shoot (before I dropped it off for her)! If you’re […]
[…] DIY | Natural Tree Stump Side Table […]
Wow, I love this! I like the DIY one better than West Elm’s.
Thanks Liz! I love the way it turned out, too. Have you ever made one? It’s a great weekend project! 🙂
[…] Natural Tree Stump Side Table […]
Hi Justine Celina,
Overall, how long would you say this project took you overall?
What kind of tree did you have for your stump?
I will get started as soon as spring is here, i’m excited!
Thanks for explaining this project of yours!
Celine
Hi Celine! You’re welcome — I hope you find the post helpful when it comes time to start your project. 🙂
As I mentioned in the post, the stump needs time to dry out. Ours had about 6 months to dry out fully, but a minimum of 1 month of drying time in an indoor environment is recommended. In terms of the actual time needed to complete the project, I would plan for a full day. I wasn’t able to find out the type of tree the stump came from — however, the type of wood isn’t important. I’ve had friends and readers follow the tutorial and using many different kinds of wood. Good luck!
hi, is a polyurethane finish needed for using it outside?
Hi Jan! Unfortunately I’m not sure as I created my table to be used indoors. It seems logical that it would — however, I would suggest visiting a local Home Depot or similar store and speaking with an expert to discuss what’s best for your needs. Good luck with your project!
You inspired me; a friend gave me a log from an old apple tree because I had been lusting after a natural table from West Elm. But didn’t want to pay their price. Saw your post. Followed your step-by-step and am now in the process of sealing my little beauty. Bonus–I now have my own small collection of chisels and sanding sponges.
Thanks for the inspiration.
Pam, that’s amazing! Thank you for taking the time to leave a comment — I’m so glad you found the post helpful. I’d love it if you could snap a photo so I can see how it turned out! I hope you enjoy your new table.
Do you seal the bottom?
Hi Ellen! Great question. I left the bottom raw and didn’t have any issues. Good luck with your project!
Very cool table! I am currently in the process of drying a stump inside my house, hoping to make it into a table like yours. An issue has just come up – when I looked underneath the bark (the stump is dry in some places and I can lift a part of the outermost layer), I noticed what looks like green-ish white fungus growing on the softer layer.. Have you ever run into this problem? Do you know if I can remove them by sanding?
Hi Hans! I didn’t run into this problem, but my guess is that it would be excess moisture leaving the wood and getting trapped between the wood and the bark where it’s peeling away. If you can easily remove the bark with your hands, go ahead and do so — then leave it to dry for the full timeframe (1 month minimum, but I’d recommend closer to 6 months to ensure minimal splitting). You should be able to sand the fungus right off! Good luck — let me know how it works out for you!
[…] Image credit: Justine Celina […]
I would love to do this for my son’s nursery! My concern is bugs. Did you do anything to kill any potential bugs dwelling deep within?
Hey Morgan! I didn’t. I did some research and if you give the stump adequate time to dry out it’s not really an issue. I’ve done a few since and haven’t run into any bug problems. Best of luck with your project — if you give it a go, please let me know how it turns out!
[…] and love the challenge of figuring out how I can achieve a similar look for less — like the Natural Tree Trunk Side Table I made for a third of the price of its West Elm dupe, for example. Over the years that post has […]
[…] DIY | Natural Tree Stump Side Table (I have another live edge table DIY coming soon!) […]
Hello! I love your post on this! I was given tree stumps because my family knows I love DIY projects and theyre perfect for this stump table. I’m creating mine for outdoor use & I would like to know the sealant you used to create that natural look? I’m not staining mine either so I want the finish product to be similar to yours. Thanks in advance 🙂
Hi Clarissa! Thank you so much. I used a satin finish Varathane (as noted and photographed in the post — check out the ‘What You’ll Need’ section). Best of luck with your project!
Hi Justine – thank you for this helpful tutorial! I have secured two stumps from a freshly cut Ponderosa Pine tree and have already removed the bark. I’m a bit pressed for time (need the table in ~2.5 weeks) and was hoping to speed up the drying process by putting the stumps outside in the sun. It is 30+ degree celsius weather here (and a desert climate), so I figured it would be quicker than if I dried it in the garage. How can I tell if the stumps are dry enough to begin the sanding/staining process? Is the only drawback of drying the stump quickly that it will develop cracks? Would that effect the aesthetics of the tables severely? Thank you in advance!
Hi Lauren! You are very welcome — I’m glad you found this post helpful. To answer you questions:
1) How can I tell if the stumps are dry enough to begin the sanding/staining process?
For us, the bark fell away easily from the stump for the most part — that’s how we knew it was ready to begin finishing. However, if you’ve already removed the bark and it was fairly easy to remove, that’s a good sign!
2) Is the only drawback of drying the stump quickly that it will develop cracks?
I can’t say for sure as ours dried out inside a garage, however, cracks will inevitably develop as the stump dries out. It seems to me that drying out in a hot climate would increase the chances of cracking, but it also depends where the tree came from and the type of environment it’s used to. As I mentioned, I personally love the crack in our stump — most of the ones you purchase premade have cracks as well.
Sounds like your stumps may be dry enough to stain — but the only surefire way is to finish one and see how it goes. The risks of finishing one that isn’t dry enough is that you’ll trap moisture inside the stump and it will begin to grow mildew on the bottom if left untreated. It’s ultimately up to you if that’s a risk you’re willing to take! I’d recommend letting them dry outdoors foras long as possible before you begin finishing, as it’s only a weekend project. If it were me I’d leave them for the additional 2 weeks you have and use the .5 to complete my finishing!
Best of luck and let me know how you make out!
I am getting started right now using your tips. I’ve had it dried for about four months. I love creating or refurbish ing furniture… it gives an extra value to it and makes me proud of my accomplishments 🙂
Thank you for the step by step explanations…
That’s awesome, Christine! Let me know how it turns out. It’s so satisfying DIYing things for your home, isn’t it?
Hello Justine! great article! I have a question, how can I prevent my stump to get affected by termites or other wood eater insects?
Hi Joanna, thanks for the feedback. This hasn’t been an issue for me for any of the tree stump tables of driftwood wall hangings I’ve made — I haven’t treated any for bugs. Allowing for sufficient dry time in a heated space (a garage is ideal) really helps.
Great! Many thanks for the advise and have a nice day!
You’re very welcome! Best of luck with your project.
Hi, Justine. We are having a storm damaged pine tree taken down. It has a really large trunk. I am concerned that the stump will be too heavy to move. What are the dimensions of your stump?
Hi Marcy! This stump was about 16″ wide and 22″ high. It wasn’t heavy at all and I could easily lift it myself. That said, I have made much wider stumps than this and put legs on them. Those ones were only about a foot thick. I’d recommend measuring the height of your existing coffee table / side table and cutting the stump to a similar height. You could make several side tables like the one in the post with a large tree. And you can always get a few people to help move it around! Best of luck with your project.
Hi, can you specify whether your Varathane polyurethane sealant was water or oil based?
Hi Erin! The one we used was water based.
Fantastic idea. Waking up to this this beautiful table made out of pure tree trunk would be like sleeping in nature. Not only the side table makes the room looks so good but also it creates an expression. The room will feel elegant and would really make it live able. Thanks for this beautiful idea.
Thank you so much, Mariah! I love to bring the outside in — we have tons of natural elements in our home. I do find it creates such a serene environment!
[…] DIY | Natural Tree Stump Side Table (I have another live edge table DIY coming soon!) […]
Hi Justine, I have an issue with mould on the bottom of my stump. I sanded it but did not varnish it and brought it inside. After a few months I noticed the mould. I left the stump in the garage for a year and assumed it would be dry before I started the project. I’m in Canada so the winters get very cold. Maybe that had something to do with it? Am I still able to use the stump now that it has mould if I remove it? Do you know how I can Do that?
Hi Sandra! I’m sorry you’re having trouble. As I didn’t experience this issue with my stump I’m not certain how to troubleshoot (we’re located in Alberta and didn’t experience any molding with our stumps or tables). Personally I would be very wary of working with a stump that has moulded for health reasons. I suppose you could try sanding the mold off (wearing a mask) to gauge the extent of the problem, however, I would do so very cautiously. It would be worth giving your local Home Depot or wood working store a call to see what they recommend. Best of luck!
[…] See it here: www.justinecelina.com […]
[…] View the full tutorial at justinecelina […]
I cannot wait to make one. been saving this link for a while. What type of wood did you use??? I have an abundance of poplar stumps
Hi Dustin! I actually never found out what type of wood our stump was, as it was an old tree hastily removed from a friends yard (it was growing into a power line) and they weren’t sure. Having said that, the type of wood isn’t important and poplar would be an excellent candidate for this project. I’ve had readers use just about every type of wood imaginable! Wishing you the successful project — I’d love to know how it turns out!
Hey Justine, No doubt that is a great tree stump side table, Sometimes I was thinking to make one like your but due to a heavy working schedule, I can not.
By the way, this has broadened my knowledge in this section. Thanks for sharing.
I’m glad you found the post informative, David!
[…] Natural Wood Tree Stump Side Table […]
Hi Justine,
Awesome effort at your end! Hoping to get some tips from a pro like yourself!
We’re currently in the midst of a major tree stump project. Unfortunately, had to cut down a large tree in our yard because it was too close to the house but had 5 large stumps to work with as a result. Have few questions.
1) We kept the stump to dry but they got infested by carpenter ants (we think) 2 weeks in. Saw powder/saw dust around the stumps. We immediately sprayed a termite + carpenter ant killer solution. Upon de-barking few weeks later, we noticed an abundance of holes throughout the stump that the ants had dug and laid eggs in, some hatched and others not. We had to painstakingly clean up each of the holes with a needle before sanding. There’s just no way to completely get rid of the holes even after hours of sanding per stump. Have you run into anything like this? How did you deal with it? Any suggestions to deal with the numerous tiny holes left behind?
2) Any suggestions for solutions to use to treat future infestations? I bought Penashield off of Amazon but do you know of anything else?
3) How did you cut perfectly flat and even end cuts for the stump? Do you have any specific machines? Since this project just landed on our lap because we had to cut down a tree, all we had was a chain-saw – and that definitely doesn’t help get perfectly parallel edges. Result – a table that wobbles. Any suggestions?
I tried to get 1 of the stumps to have a glass-top using Deep Pour Epoxy resin…however it was a disaster. Long story short – the duct tape bank along the top surface wasn’t enough to stop the resin from leaking through 1 tiny crack in the tape in a particularly uneven part of the edge and as a result, the resin leaked all over the plastic that the stump was on 🙁
4) Have you installed legs or wheels on stumps to be able to easily move it? Any suggestions? We hope to use these as side-tables or chairs….and they’re heavy! We have a hardwood floor so trying to avoid something that’ll leave scratches.
5) I gave 2 stumps so far 2 coats or the Penashield followed by 2 coats of Spar Urethane from Home Depot. Do you think there’s anything else needed to give it a nice seal and protection for exterior use?
6) Even couple of weeks after the above coats for he 2 stumps, the cracks continue to grow – how can we stop it from cracking further?
Appreciate all you inputs in advance!
Parry
Hi Parry;
Thank you for your comment and questions. For perspective, I’ve created 2 natural tree stump pieces and have followed this exact process. I haven’t run any of the issues you’re experiencing, however, I’ve summarized some insights and tips below:
1 & 2) I have never run into infestation issues, so am not able to offer any insights or troubleshooting.
3) We used a table saw in the garage to cut the edges. They’re not perfectly even, however, we were able to get them pretty close with additional sanding.
4) I’ve used felt furniture pads with self adhesive on the bottom of all the pieces I’ve created — this works perfectly to slide them around on hardwood without scratching.
5 & 6 ) I don’t have any additional information regarding staining or sealing than what’s listed in this post. I’ve followed this exact process and used these exact products for both pieces and haven’t experienced any cracking, therefore am not able to offer any insights or troubleshooting. I would suggest following instructions listed on your specific product, or following up with the maker of the product for troubleshooting.
Best of luck with your project!
Justine
[…] easiest style on our listing, this round collection of smoothed-down tree stump seats and enormous tree stump table produce a campfire aura to any yard they’re in. That needs pricey garden furnishings when you […]
[…] yes, Monica’s nightstand is basically a tree stump. Because how else will the bluebirds and chipmunks know how to find […]
[…] pagsugod sa panaw sa paghimo sa usa ka DIY natural nga tuod sa kahoy nga lamesa sa kilid. Kini nga proyekto nagdala sa gawas sa sulod, nga nagpakita sa hilaw nga katahum sa […]
[…] 22. Upcycle Spare Wood Pieces Into A Side Table […]